How to achieve Gradient Nails Part 2: I used Texture Polishes & Pueen plate 40

Saturday, July 20, 2013

Hola!

Here is another way to achieve gradient nails without the hassel of using a cometic sponge/wedge.
No special tools necessary just your ordinary nail brush. 

Sometimes it such a pain to clean up after making gradient nails, so I wanted to show you guys another way to do them.  You can also do this method and then use a cosmetic sponge/wedge at the end of the process to give it a more blending effect & less mess! :) 

If you would like to see my post on Gradient Nails using a cosmetic wedge visit here .

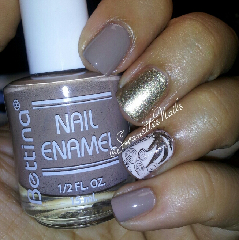
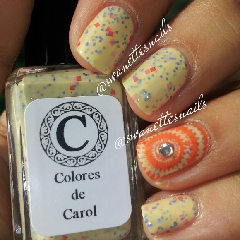
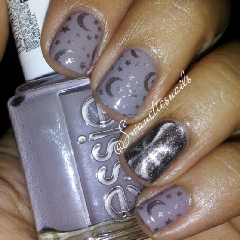
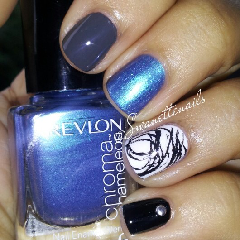
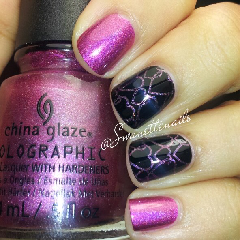
Here is the mani I posted yesterday on my Instagram:


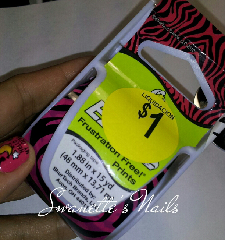
Nail products used for this mani are:

1.  Nail Life Gripper Basecoat
2.  Julie G Tangerine Dream, from the Gumdrop Collection
3.  OPI Magazine Cover Mouse, Liquid Sand
4.  OPI Jinx, Liquid Sand
5.  Pueen Stamping plate 40
6.  Stamping Color:  Wet n Wild Black Crème
7.  Seche Vite Top Coat (optional, only if you love a shiny finish)

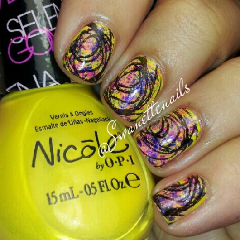
Steps in achieving a gradient nails:

1.  Apply your favorite Basecoat.
2.  Apply Julie G Tangerine Dream to the upper part of the nail just 1/3 of the nail.  I applied two coats, wait for polish to dry between each coat.
3.  Now apply your second color which is OPI Magazine Cover Mouse to the other 2/3 part of the nail, the middle section.  Two coats.


4.  Then you apply your last color OPI Jinx to the bottom part of the nail.  Two Coats.


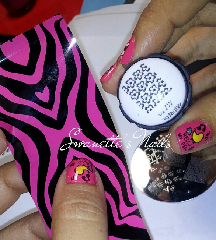
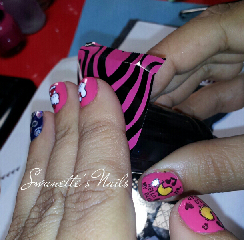
5.  Your nails should look like the pic below.  You can reapply in any area that needs to be reapplied. 


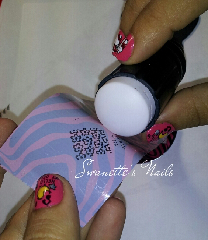
6.  Finish it with your favorite stamping design.  I chose Pueen plate 40.


7.  If you wish, you can also apply a topcoat to your texture nails.  I honestly love both looks.


I hope you enjoy my post!!  Which method do you prefer?  Or if you have another method to achieve gradient nails I would love to hear about it. :)

Hasta Luego amigos!

Swanette


How To Achieve Gradient Nails, A Picture Tutorial

Wednesday, July 17, 2013

Hola!


Here is tonights mani!  Its a gradient mani.  The gradient effect is fading two or more colors together on the nail creating a colorful mani.  There are many video showing how to achieve this look.  Its very easy, fun but messy. 


I used:

1.  A makeup Sponge Wedge.  (These are the ones that look like triangles)
2.  China Glaze White on White ( My base color:  applying white will make neons brighter)
3.  China Glaze Sun Worshiper (Color near cuticles)
4.  China Glaze Japanese Koi (Middle color)
5.  China Glaze Pool Party (nail tip color)
6.  Stamping plate Pueen 31
7.  Stamping color Wet n Wild Black Crème.
8.  Nail Life Gripper Base Coat.
9.  Seche Vite Top Coat

Here is my mani:


Steps:

1.  Start with your favorite Base Coat.
2.  Paint all your nails White.  Using white as a undie (base coat) helps neons appear more brighter.
3.  Take you makeup wedge and apply the three colors. 

4. Take the makeup wedge and dab it on your nail.  Pressing very lightly and you will see how the colors blend on your nails.  (For demonstrating purposes I didn't apply the white base here.  I just wanted to show you how to achieve a gradient effect.) 
5.  After you dab your sponge on the nail you should have a gradient effect like below.  I recommend you letting each coat dry and repeat the process until you have reach the desire effect.   Don't be alarm if you are left with an uneven look or maybe slightly rough look, because this will even out when you apply your top coat.


6.  Now you should apply a top coat.  This will help out smooth the nail, blend in the colors better and leave you with great base for your stamping. 

7.  After it dries you apply your stamping and finish off with your top coat! 


I hope you enjoyed my post and try it out too! 

Hasta Luego!

Swanette


Sally Beauty Supply Buy 1 Get 1 Deal!! 2 Days only!

Tuesday, July 16, 2013

Hola!!

Here is a great deal!!  Sally Beauty Supply has a Buy 1 Get 1 Deal on China Glaze, Orly or Gelish Soak-off Gel Polish.  Limit 2 per customer.  That means you can get 4 polishes.  This offer is valid in Puerto Rico too!! Yay!  This offer was posted on their facebook page:

So what did I get?? 

The four polishes I got are:
Left to right:  Sun Worshiper, Pool Party, In the lime Light and Japanese Koi.

I also got some clearance goodies.  I was lucky that my local Sally were still offering an additional 50% off clearance.  I got a China Glaze Nail Polish Appliques, A Nail Life Gripper Basecoat, six So Easy Stripe Rites plus two China glazes names Hawaiian Punch and VII.  Remember to ask if your store has any deal with clearance items, you might get lucky! :)

Are you stopping by your local Sallys??  If so what are you getting?  I would love to know.  Remember this deal is for 2 DAYS ONLY!!  Run! But be careful! lol

Hasta luego!!

Rica's 3-Free Glossy Glam Top Coat

Friday, July 12, 2013

Hola Chicas!!

I am so happy to present to you Rica's 3-Free Glossy Glam Top Coat.  You can find Ricarda on Instagram @justricarda, her blog is here and here is her Esty Shop .

I was so happy that she sent me her new Top Coat to try out.  I received it yesterday and just had to try it out immediately.  A picture has a thousand words, look below to see what this beautiful Top Coat does:

(This pic was taken indoors.)
Nail products used-  3 polishes from Orly Mineral FX Collection:  Stone Cold, Rococo A-Go-Go & Emberstone.  Stamping plate Red Angel 106.  Stamping Color:  Essie Good As Gold
 
(This pic was take outdoors.  It hasn't been sunny in Puerto Rico these couple of days.)
 
 
Now, lets continue....
 
What do I look for in a top coat?  Being a stampaholic the first thing I want from a top coat is that it DOESN'T smudge my nail stamping design.  Second, I want my mani to shine like a diamond!  Third, I would like it to dry fast, because I am a busy mom.
 
My thoughts.....
 
1.  I was amazed on how Glossy Glam didn't smudge my stamping.  Believe me when I tell you I have tried a lot of top coats and every single one has smudge my design except Seche Vite.  I even tried it immediately after stamping and No Smudging!! I just couldn't believe it!
 
2.  This beauty leaves your mani super shiny! Amazing!  Just like the name says Glossy Glam! :)
 
3.   My mani is also a gradient.  I used three polishes from Oryl Mineral FX collection.  Those polishes have glitter and dry to a rough texture.  I am happy to add that Glossy Glam Top Coat smooth out the glitter gradient and made a great base for me to stamp with just one coat!
 
4.  Last but not least, the drying time.  I have to admit she never said Glossy Glam was going to be a fast drying top coat, but my goodness it dries faster than many other top coats from leading brands which advertise fast drying top coat.   So I am very happy about that!
 
How do you get Rica's Glossy Glam Top Coat?
 
Follow her on Instagram @justricarda she posts on when her Glossy Glam Top Coat are available.  Act fast because these babies go super rapido!!
 
What do you think?  Are you going to purchase one?  Let me know in the comment section below!
 
 
Hasta Luego!!


Here is another pic I wanted to add, we finally got a little sunshine in Puerto Rico.  Hope you can appreciate it better.


How To Make Magical keys With Nail Polish!

Thursday, July 11, 2013

Hola amigos!

Today I finally decided to add some Pizazz to my keys.  Transforming them from old ordinary key to Magical Keys!! :) 

I have seen this idea all over the internet.  People painting their keys with nail polish.  Its a great way to tell your keys apart and make them look beautiful.  I wanted to try this for the longest time and I am so happy I finally I did.

At first I started to paint them on a piece of paper and was going to paint one side first then the other, but  I realize that it would take too much time and maybe they would get smudged if I would turn them over too early.


So I got an idea!  I had a piece of Styrofoam laying around and decided to stick the keys in it.  It became a base for them to stand up and I could work on both sides.  It made painting easier and in less time.


Colors used:
 
1.  Left key is Sinful Colors Black on Black covered with Finger Paints Twisted Flakies. 
 
2.  Right key is China Glaze I'm With the Lifeguard covered with Krafty Gurl Indie Polish in Melon Mania.
 
To seal in the colors I used Seche Vite Top Coat. 
 
This is such a cool Idea.  You can pizazz your keys in so many different ways.  Have you tried this yet? 
 
I hope you enjoy this post!
 
Hasta luego!!


Simple Delicate Mani Using A54 Stamping Plate

Wednesday, July 10, 2013

Saludos chicas y chicos!

Here I have another plate from the A Series.  Its A54, I used it today to  make a nice simple mani using some Bettina Polishes. 


Bettina Polishes is a brand made in Puerto Rico, until recently you could only find them in the island, but now you can find them also in South Florida.  You can see their whole line of Cosmetics here http://bettinacosmetics.com/ .   Bettina polishes are very opaque polishes and apply very well.  I really like to use Bettina, especially for stamping.  A lot of their cream polishes have the right consistency for stamping. 

Ingredients to this simple delicate mani:
1.  Index and pinky Bettina 192 Lyrical
2.  Middle Finger:  Bettina Glamour Celebrate
3.  Ring finger:  Base color is Bettina Marshmallow, stamping plate A54, Stamping colors:  Bettina Art Deco Brown & Bettina Glamor Celebrate.
4.  I stamped two times on the ring finger. I stamped the whole design using Bettina Art Deco Brown  and then I stamped using Bettina Glamor Celebrate only the palm leaves.
Espero que te haya gustado!  I hope you enjoyed my mani!
Hasta Luego!


Stamping with plate A47

Tuesday, July 9, 2013

Hola!
I hope everyone had a great Monday! 

Tonight I took out my A Series plates, I had them stored away in a small wooden box.  A Series plates are stamping plates made in China.  I don't know the brand I just know them by A series plates.  I purchased them on Aliexpress.com a long time ago.   These plates are larger than your regular stamping plates like Bundle Monster and even larger than Cheekys Summer plates.  The images are very large, great for long nails and even toe nails.  You can also find them on Ebay.  I do recommend you look for a good seller, remember to read their feedback, read about their shipping fees, especially if buying on Aliexpress.com.  Its very important to do so because you might get low quality plates, which is a downside when buying on Aliexpress.com.

I have to add something very important in this post.  These plates have NO backing cover on them and are EXTREMELY sharp.  Believe me I have cut myself a few times with them...ouch!  I tried to file them down but they are still sharp.  Please be careful handling them. 

Here is plate A57:


I honestly don't know what these images represent, but I think they look beautiful. Below is the mani I posted on Instagram.  A friend on Instagram said that my mani look like a design you would find on a antique Holland plate.  What do you think these images are?  Let me know in the comment section below!


Nail products used:
1.  I applied Bettina Marshmallow to all my nails as my base color.
2.  Stamping plate A47
3.  Stamping color is Bettina Jeans Over Dyed.
Hasta Luego!

Colorful Mani using Winstonia W110

Monday, July 8, 2013

Hola!

Here is the mani I posted yesterday on my Instagram.  Its been along time since I use the baggie method.  If you don't know what it is check out here.  Its also located on my Label section (right bottom side of my blog) called The Baggie Method. 

I used some of the polishes I purchased from Kmart and Sally Beauty Supply. 

Ingredients to this yummy colorful mani is:
1.  Nicole By OPI Hit The Lights
2.  Nicole By OPI Selena
3.  Nicole By OPI Spring Break
4.  Finger Paints It's An Original!
5.  Color Club Miss Bliss
6.  Winstonia stamping plate W110
7.  Stamping color:  WetnWild Black Crème
8.  Seche Vite Top Coat
Steps:
1.  Apply two coats of Nicole By OPI Hit The Lights on all your nails.  Let it complety dry.
2.  Then start the Baggie Method.  Applying each color one by one using this method.  I used Nicole By OPI Selena, Spring Break, Finger Paints It's An Original!, and Color Club Miss Bliss.  In that same order.  Applying light pressure to the piece of bag on nail. 
3.  After you apply all the colors using the baggie method apply a coat of Seche Vite.  This helps blend in all the colors and makes a flat surface for you to begin your nail stamping.
4.  Stamp using W110 and WetnWild Black Crème to all nails.
5.  Finish off with your favorite top coat.  I recommend Seche Vite.  At the moment it has been my favorite top coat for stamping.  It doesn't smudge your nail design.
I hope you enjoy my post!  If you have any questions let me know in the comment section below.
Hasta Luego!
;) Swanette

Colores de Carol

Hola!

Today I am showing you five beautiful Indie polishes I purchased from Colores de Carol.  I love Indie Polishes!  If you didn't know, Indie polishes are polishes that are home made by amazing gals who love polish!  They add the best ingredients with a magical potion to create a beautiful and unique polish you won't be able to find at a store!   

You can purchase Colores de Carol Indie polishes at http://www.coloresdecarol.bigcartel.com/  I also recommend you following her blog where she post her reviews and her beautiful nail art at  http://www.coloresdecarol.com/ .

Here are the beautiful polishes from Colores de Carol plus the ingredients I used for each mani:

 
April Fools:
 
1.  Index finger and middle finger:  China Glaze Splish Splash, XL stamping plate #C & stamping color:  Color Club Beyond.
2.  Ring Finger Colores de Carol April Fools over Zoya Purity.
3.  Color Club Beyond.
 
 
Blueberry Mango Sorbet
 
1.  Colores de Carol Blueberry Mango Sorbet on all nails.  Without undies (base) under.
2.  Ring finger:  Winstonia stamping plate W111 & Sally Hansen Orange Impluse.  Plus a small Rhinestone. 


Daffodil
 
1.  Index and Pinky:  China Glaze I'm With The Lifeguard, XL stamping plate #C and stamping color:  Essie Good As Gold.
2.  Middle and Ring Finger:  Colores de Carol Daffodil over Zoya Purity.
 
 
Hero In Disguise
 
1.  Colores de Carol Hero In Disguise over all nails.
2.  Ring finger:  Stamping plate Pueen 44 & WetnWild Black Crème used for stamping.
 
 
Cupcake Fantasy
 
1.  For all Finger except Ring Finger I used:  Sally Hansen Fast Fuchsia, Cheeky stamping plate 38 & stamping color:  Sinful Colors Snow me White.
2.  Ring Finger:  Colores de Carol Cupcake Fantasy.  I used no undies (base color)
 
 
Aren't they beautiful!  I love them all!  Colores de Carol recommends you shake your bottle well before use.  She also recommend placing your glitter polish upside down at least ten minutes before application because the larger glitter can sink to the bottom.  Also apply thin coats, and wait 1-2 minutes between them.  Then finish with a top coat.  I did this and had no problem with the application.  They are so fun to wear alone or combine it with any nail art. 

I hope you enjoy my swatches!  If you have any question or comment please leave it in the comment section below!

Hasta Luego amigos!!


Nail Stamping 101: How to Clean Your Stamper

Saturday, July 6, 2013

Hola! 

I am back with another stamping tip!  This one involves your stamper! 

How To Clean Your Stamper

Before I used Acetone to clean my stamper, especially my Konad stampers.  After I received my Squishy black and white stamper from Ebay I had to find another method.  The Squishy stamper is very sticky.  It attracts dust, hairs and cotton fuzz.  It was a pain to clean.  If I used acetone with the cotton ball or pad it created a mess.  There was cotton fuzz all over the stamper.  So one day I tried tape to see what would happen and... Wepa! ... it clean my stamper with ease!   I have found out that many other nail stampers I know on Instagram used tape too, I guess all great minds think alike!

Using tape is much more easier than using acetone.  You will save money on acetone and cotton balls or pads using this method.  I find that any tape will do the job, so it doesn't have to be expensive.  I found this pink zebra tape roll on clearance for $1 at Walgreens and it works great!


Steps on how to clean your stamper:
 
1.  Take a piece of tape.  Any tape will do the job.  I usually tape it to my desk and leave a long piece so I can gently lift and press my stamper on it without touching it too much with my hands.  I don't want to mess up my mani.  For the pictures I didn't do that but you can also do the following just be careful you don't mess up your nails.  There are many ways you can do this just look for the method that is right for you!


2.  Press the tape on the stamper.  Making sure it is sticking on all the surface of the stamper.


3.  Then just pull the tape away from the stamper.  Sometimes the rubber piece of the stamper comes out, but no worries just put it back in.  Now you have a clean stamper!  Have fun stamping!


I hope you guys enjoyed this stamping tip on how to clean your stamper without the fuss of cotton fuzz sticking on it!


Hasta luego amigos!!


Coloring in your stamping images! An Advance stamping technique.

I am so excited to share this with you guys!
This is so awesome!!

First of all this is not my idea.  I found this awesome nail stamper called @maespiritu_artofnail on Instagram and this is her blog http://artofnail.blogspot.com/ .  She has a wonderful post called Advance Stamping Technique Tutorial that you must read pronto!!  There she teaches you how to color in your stamping designs... just like you would a coloring book. 

I have to admit it took some practicing but you will get it and fall in love with it too!! Here is the mani I did with her technique.

 
Ingredients for my yummy keropi/icecream/ladybug mani!
This was the result of practicing with different images.
 
1.  Base color on all nails:  Ruby Wing Electric Firefly.
2.  Ring finger:  Stamping plate:  QA24. Stamping Colors:  Sinful colors Black on Black, Sinful Colors Irish Green & Sinful Colors Snow me White.
3.  Middle & Ring Finger:  Stamping plate:  Kd7.  Stamping Colors:  OPI San Tan-tonio, Finger paints Model Colour & Nicole by OPI Love Song.
4.  Pinky:  Stamping plate M30.  Stamping color:  Sally Hansen Xtreme Wear Cherry Red.


What do you think about this technique?  Isn't it amazing?  Tell me about it in the comments.
 
 
Hasta Luego!!


Yay!!! Sally Beauty Supply Red Tag Sale is BACK!!


Hola!
Here is another deal!
 
 
Sally Beauty Supply Red Tag Clearance Sale is BACK!!! Yay!!
 
This is time to buy polishes at Sallys!  They have a lot of collections on clearance, but it varies store to store.  If you have a few Sallys nearby go check them out pronto!
 
There comes a time where Sallys wants to get rid of there clearance and has this awesome deal.  They give you an additional 50% off Clearance! You can get Fingerpaints, China Glaze, Orly and other for cheap! 
 
This is what I scored at Sallys:


Finger Paint for $1.35 each.  Colors L to R:  It's an original, Model Colour & Leonardo Da Vin-pink


Beauty Secrets Non-Acetone for $4.25


Just to give you a heads up, they have China Glaze Hologlams on clearance for $3 after additional 50% off.  They have China Glaze Avant garden Collection on clearance too!  I even saw polishes from Christmas 2012 collections, Magnetixs, Tranzitions, and Crackles. 
 
So what are you waiting for? Go and get you some goodies too!  I would love to see your haul, just tag me on Instagram!  Or tell me what you scored at Sallys!
 
 
Have fun shopping amigas! 

Nicole by OPI on Clearance at Kmart!!! Run and Get some!

Hola!

If your following me on Instagram you would know I did some shopping at Kmart yesterday.  Kmart is my favorite place to shop for Clearance.  Not only do I buy nail polishes here, I look for clothes, home items, toys, shoes, etc on clearance!  Yay for Clearance! 

I follow a lot of Puertorican nail polish addicts like myself on Instagram, and the girls where finding Nicole by OPI on clearance for $1.74.  I told myself repeatedly not to go... but I just couldn't control myself... oh God... hahaha.  When I arrived I didn't see any in the clearance bin so I went to the regular Nicole by OPI display.  I started to grab a few and went to the price scanner, and BINGO, I got some! :)  They weren't marked down at this store so I recommend scanning them all to find them.

These polishes are from Selena Gomez spring 2013 Collection.  This collection consists in 14 lacquers, but not all are on clearance.  The glitters in the collection are not on clearance just the others.  I am guessing that they will be on clearance in the near future so keep your eyes on them. 

These are the ones I purchased:

 
(Left to Right-  Hit the lights, Selena, Love Song & Spring Break)


I hope you guys are able to score some too!!  Remember to scan them before purchasing.
 
 
Hasta luego amigos!! 

4th of July Mani

Thursday, July 4, 2013

Hola!

To everyone that celebrates Independence Day! Happy 4th of July!!! I hope everyone has a wonderful day!  Be safe!

I had been seeing so many Instagram fourth of the July manis that is was very hard to accomplish something different.  As you know its can be very hard to be different when nail stamping, well because everyone has the same plates and you can easily copy someone without being aware of it.  I really tried my best to make a creative 4th of July mani.  I hope you guys enjoy!


4th of July Mani:
1.  Ring & Pinky I applied China Glaze White on White and applied Krafty Gurl Indie Polish in Liberty Belle.
2.  Middle Finger I applied China Glaze Man Hunt, Stamped using KD3 plate using Sinful Color Snow me White.
3.  Ring Finger I applied China Glaze Adventure Red-y.  I stamped waves using Bundle Monster plate 210 and Sinful Colors Snow me White.
4.  Finish everything of with Seche Vite my favorite Top Coat.  It doesn't smudge your stamping design.
I would love to see your nail stamping designs too! Just tag me on your pics on Instagram!

Hasta luego amigos! 


Polish Addict Nail Color Haul

Wednesday, July 3, 2013

Hola!

Thru Instagram I have been introduce to the world of Indie Polishes.  Indie Polishes are handmade polishes by awesome people who love polish.  They create unique and fun polishes that you won't be able to find in stores!  I am trying to build my Indie stash little by little looking for beautiful polishes to add to my collection! 

Today I have three polishes from Polish Addict Nail Color.  You can find her on IG @polishaddictnailcolor or here.  Her store is here.  Here is the pic of the beautiful polishes I purchase from her: 

L to R:  Cool Summer, Dr. Franken and Lipstick & Shades
 
 
They are gorgeous! Jam packed with magical glitter! Simply beautiful! If you love glitter polish then you should definitely get some too!  They are very easy to apply.  No fishing out glitter! All the manis below where applied two coats.  I just love all the neon glitters!! I am so glad to have them in my collection! Without further adieu here are my manis:


1.  Cool Summer:
Base color:  Zoya Pippa, Cheeky stamping plate 31, stamping colors: China Glaze Love's a Beach and China Glaze Splish Splash.

 
2.  Lipstick & Shades:
Base Color:  Bettina Jeans Sand Blast, IG@justricarda Rica Glam 01 stamping plate and stamping color China Glaze Love's a Beach.
 
 
3.  Dr. Franken:
Base Color:  Bettina Ortensia, Winstonia stamping plate W111, stamping color:  Sinful Colors Black on Black and Kiss Nail Artist metallic accent.


I hope you enjoyed!
 
Hasta Luego! 


A Clearance Haul & Two Manis

Hola!!

I wanted to share a clearance haul with you guys! I just love clearance! I am clearance/shopaholic.  It is so fun to look thru clearance aisles or bins looking for hidden treasures!

On this particular day I went to coupon like I usually do at Wags (Walgreens) and my daughter said, "Hey ma, lets look for clearance!".   As you see she is learning so much from her mama. :)  So as we approached the aisle I just couldn't believe it! I saw some Essie!  Jackpot!! There was a lot of colors to chose from, but I only chose four.  Then I keep looking and found some Revlons from the Chroma Chameleon Collection. I grab some of that too! This all total: $25, but luckly I have a lot points on my Walgreens Balance reward card and only paid $5!  Yes I went crazy... I know... I am not proud of myself.  This is what happens when you are a polish addict. 
 
My Walgreens Clearance Haul:
Essie box includes:  Chinchilly & Forever yummy.
Essies L to R:  Miss fancy pants, power clutch, fair game & Lil'boa peep.
Revlons L to R:  Aquamarine, Rose Gold, Amethyst & Topaz.
The Milani Runaway eyes in Naturally Chic.
I also wanted to show you guys two manis I created with these polishes.  I posted these on Instagram. I hope you enjoy!

Ingredients in my star and moons mani:
1.  Essie Miss Fancy Pants
2.  Essie Lil'boa peep on my ring finger and I used for stamping stars and moon ( It is a magnetic polish from Repstyle Magnetic Collection, but it didn't have the magnet cap when I purchased it) 
3.  Cheeky stamping plate 46
4.  Seche Vite


The Ingredients in this delicious mani is:
1.  Essie Power Clutch on index finger
2.  Revlon Aquamarine on middle finger
3.  Zoya purity on ring finger
4.  Pueen stamping plate 47
5.  Stamping color:  Sinful Colors Black on Black
6.  Orly Liquid vinyl on pinky
7.  Kiss metallic accent
8.  Seche Vite
I hope you guys find wonderful treasures when hunting thru a clearance aisle or bin!  Have fun shopping for polish!!
Hasta Luego!!

Holographic Hearts

Monday, July 1, 2013

Hola! Como estan?  Espero que bien!

Here I have Infra-red from China Glaze Hologlams 2013 Collection.  If you didn't know holographic nail polish are great for stamping, but it can be a little tricky.  The polish tends to dry up faster on the plate so you must hurry and stamp quickly.  It will take practice, but the final result is beautiful. 

Ingredients in this Mani are:

1.  China Glaze Infra-red
2.  Orly Liquid Vinyl
3.  Pueen Stamping plate 41
4.  Seche Vite


Hasta Luego!

P.S.  Sally Beauty Supply has the China Glaze Holograms on Clearance for $5.99.  Always ask is they have any deals on Clearance!  You never know you just might get lucky!
 
FREE BLOGGER TEMPLATE BY DESIGNER BLOGS